
Maximize Your Art Studio
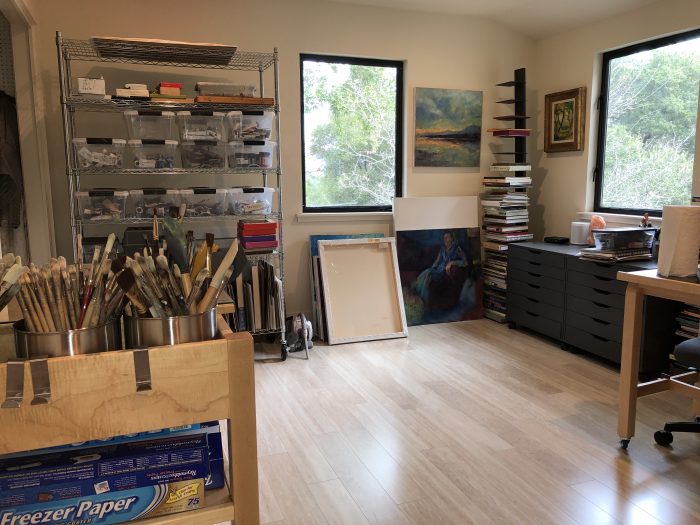
My art studio is only 143 square feet. In order to maximize my space, I had to be creative. I also wanted to make sure that there was flexibility and mobility of the furniture used and find extra storage where you wouldn't normally. It was important that the furniture and flooring was impervious to paint and that accidental spills were easily cleaned.
Home Depot provided a great selection of flooring. I chose Pergo Laminate. The price is very reasonable. There are many styles of Pergo, but all are not equivalent in regards to staining. I brought samples home and found that XP Vanilla Travertine was excellent even though very light in color was impervious to stain. I chose the most highly saturated pigments of oils to test. All came off with a cleansing wipe. It was that easy. As a plus, I found out after installation that the floor is a floating floor, the cushioning is very forgiving on the body especially during longer sessions at the easel.

You don't have to reinvent the wheel, the internet has many ideas to improve organization, as well as, help you create more valuable storage. I'm going to share my Art Studio Pinterest board that is chock full of ideas that will improve your studio. Although, it took some time to create this Pinterest board it saved me so much time and money.
Extra storage for my closet was installed by California Closet. I love the file drawers, the peg boards that have wire racks and plenty of shelves for open storage. Taking off the closet doors also gave me more space exteriorly.

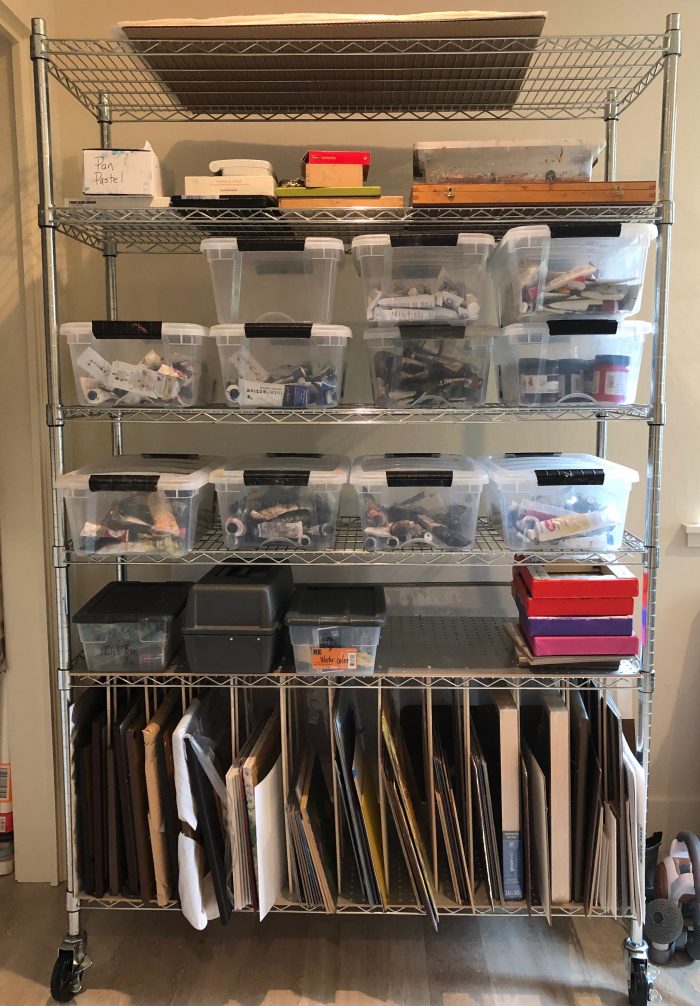
Now for the furniture! All my furniture in the art art studio are on rollers, except for the book towers. The rollers allow each piece of furniture the ability to be used in more than one way, can be stored in one area and brought out when ready to use. If you can't go out then you must go up was the reason for my next choice; the 77" high Wire Shelving rack. I wouldn't have a clue where I would put all my art supplies without this item. Clear plastic tubs storage for acrylic and oil paint fit perfectly. The rack not only was able to hold all my art supplies, but with a few extra materials, peg board and dowels, created upright storage for small paintings.
I had previous book towers for my art library. There are many places that you can purchase them. The towers both fit perfectly in the nook, one framing each side of two Alex Drawer Units that have six drawers each. This is a great alternative for filing paper art, that normally would cost a fortune, when purchasing furniture specifically meant for art storage.

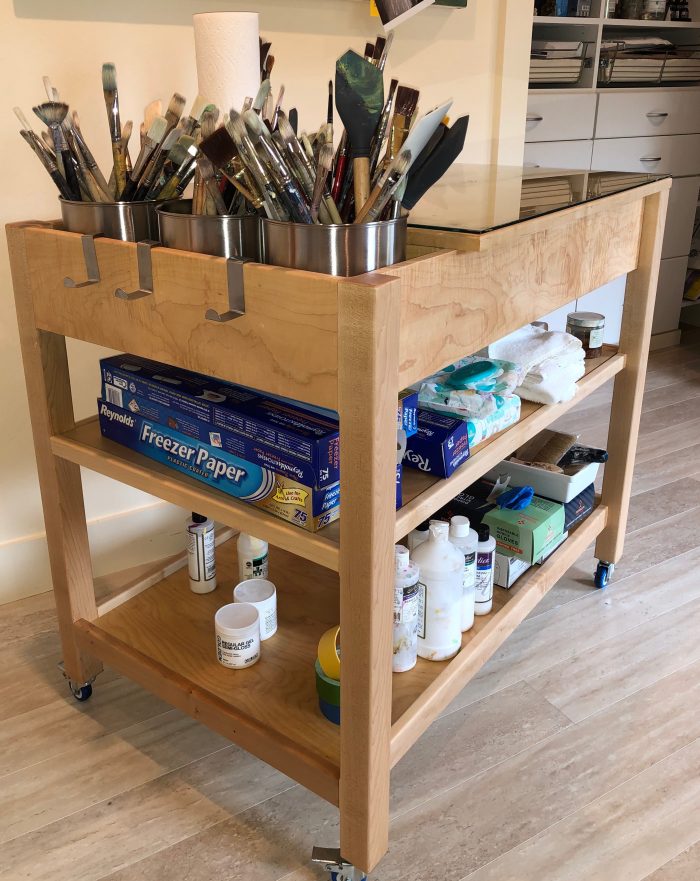
My beautiful art cart was designed to be my pallet, protected by a glass top cut to size. The cart also contains all my brushes placed in cylinders that fit perfectly in the cubby, pallet knives, rollers etc., hooks for garbage bags, and extra art supplies. If you have any interest in the cart and you live in the vicinity, my friend said he would be happy to design more. He is an excellent craftsman.
He also helped me design a desk with a side table. This is probably my favorite piece in the studio. The table can lie flat or one side lifts up creating an easel for smaller artworks. This table is excellent. It is so functional and could be used in so many ways. I can use it to draw, as well as paint smaller pieces and when the easel partition drops down, the table can be used as a larger pallet. Cover the table with Reynold Freezer paper lay your paint down, use and dispose when done; making it easy for a quick cleanup.

Now last but not least, one of my pride and joy pieces from Paper Bird Studio and Design. The 66" x 66" Red Oak wall easel made by Jason Tueller . This wall easel probably saves me a third of my studio space. All the material used to make this easel came from one Appalachian Red Oak and hand made. For as much work that went into this product I find it extremely worth the purchase. The easel gives you the ability to paint more than one painting at a time as well as by sliding the mounts together a large painting can be created.

If you have any questions please put in comments below. And also I would love any suggestions or ideas that you may have to share in creating your studio. Thank you!
Where Have I Been?
I'm so sorry I have been missing. Last year and this year has been a pursuit to explore and discover. I have taken many classes some that you may have read about in my previous posts, with Melinda Cootsona and Martin Campos. After taking the classes with Martin and Melinda, I took two eCourses with Pauline Agnew that included Pathways to Abstraction and Pathways to Abstraction The Figure. Upon completing I took another class from Melinda on Six Approaches to Abstracting the Figure. I have been very fortunate to be able to take classes from teachers that are masters their field.
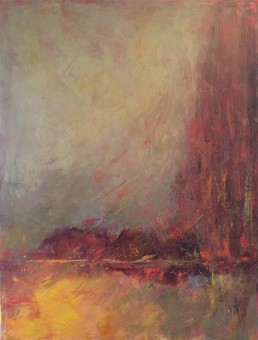
Needless to say I have been working very hard and have a lot of new work to share. The painting that I am showing above, "Red Wind" is one of my first larger paintings using Cold Wax Medium. I love how it turned out and am very excited to present it to you. It originally began upside down, but I felt an urge to turn it in the opposite direction during the creation. I do believe that we reverse images in our mind. I now discovered a wonderful image of what appeared to me as an island with a forest reflecting in the water. The energy that swirls in the strokes is an added bonus, thus the name "Red Wind". Cold Wax allows a transparency and texture that cannot be found with oil alone. I love the depth created by using this medium.
The painting is available for sale. Please contact me if you are interested at jvander51@gmail.com

Cold Wax Part II Tools and Applications
Exploration is really the essence of the human spirit.~Frank Borman
This is part two of my Cold Wax post covering tools and applications. Please read part one before continuing if you haven't done so. We've talked about the supports and types of wax in my previous post. Essentially, it is best to use a harder support if you want to use thicker layers of wax. Below are the lists of tools and mediums used with CWM.
Tools for applying the wax: Brayers (2",4" & 6" Speedball and Inovart ), brushes (all sizes, all types), Princeton Catalyst Blades, pallet knives, Princeton Catalyst Silicone Wedge, Dough Scraper by Wilton
Tools for drawing: Charcoal, Graphite stick (preferably soft), oil sticks, oil bars, bamboo skewer, stencils, doily, Q-tips, oil pastels, beeswax crayons, knitting needles, pottery scraper, pottery carving tool, oil pen, stamps, the above Princeton Catalyst Blades and Wedges can also be used for marking.
Tools for creating texture: Rubber basting brush, steel wool, yarn or string, plastic combs, pattern tracers, plastic wrap, bubble wrap, whisk broom, muslin, florist mesh, cheese cloth
Mediums: Following to thicken CW-Marble dust, lime, coffee, dirt, graphite powder, Gilder paste, sand; Citra Solve and Gamsol to remove layers of wax, Gamblin Solvent free Gel, Solvent free fluid and Liquin to thin mixture or glaze.
Application: Prior to putting down the first layer of CWM, prime your support with a solid color of oil paint of your choice. Let the it dry throughly before laying down layers of CWM. Take a large sheet of Reynolds Freezer Paper, tape it to a flat surface. This will be your pallet. Lay out your pallet of oil paint, take a dollop of oil paint and mix with pallet knife 30 to 50% of CWM. Then take your brayer and roll into mixture on Freezer Paper. Roll the mixture on primed support. Take another color and do the same, etc. You can lay wet into wet if you have a light touch. You can dry in between layers.
It is advised that you work on more than one painting at a time to allow for drying time. You will have different drying times for different colors of oil paint.
You can then build up by layering with larger amounts by applying it with pallet knife, squeegee, wedge etc. As the wax dries, you can start to scrape, revealing the layers below, or you can use any of your drawing tools. Drawing is much easier if the layers are somewhat dry. It is easier to mark when it is tacky and not completely dry.
There isn't one way to use CWM. I noticed through my research that each artist creates their own style. Some artist may create abstracts, while other may create landscapes, still life or figures. Some artists may prefer the squeegee, wedge, scraper or pallet knife to apply the cold wax and oil paint mixture rather than the roller or a combination of both.
Experiment and have fun, discover your own way with CWM.
Below are a couple of videos using Cold Wax Medium.
https://youtu.be/mc0NvgyLm_E
https://youtu.be/M4nwjauyMZc

EXPLORING COLDWAX MEDIUM Part 1
The true method of knowledge is experiment. (William Blake)
Lately, I had the opportunity to take a Cold Wax Medium workshop with Melinda Cootsona. It was a perfect compliment to my previous workshop I took with Martin Campos. CWM has changed my perceived way of creating by lending a process in which artistic play and experimentation occurs. Cold wax effects are created by using many layers thick and thin, transparent and opaque, using brayers, squeegees, pallet knives, etc. Through scraping and scratching you are able to discover the underlying layers of colors and affects. Adding to and taking away creates an intuitive process that allows the artist and art to reveal itself. Reduction becomes as important as adding to. What is underneath becomes as important as what is on the surface. Isn't that true about our lives as well?
Currently, I'm aware of three brands of Cold Wax Medium; Gamblin, Dorland and Evans. Evans also makes a Cold Wax Paint. Gamblin's CWM is simply a pharmaceutical grade beeswax, Gamsol and a small amount of alkyd resin. As the Gamsol evaporates out of the medium the soft wax harden, similar to the consistency of wax of a candle. The difference between CWM and encaustic is that CWM can be malleable without heat; the Gamsol is the heat substitute. There is a special medium for encaustic. CWM should not be heated. And it is wise to not mix the different brands of CWM, since the brands have different ingredients. The advantage to using Gamblin brand is that the mediums that they provide are compatible with the wax.

Cold Wax Medium can be mixed directly with oil paint; usually a mixture of 30% to 50% wax. When using CWM in higher percentages on stretched canvas it is best to first add to the wax 25-50% Galkyd Gel, Solvent-Free Gel, or for a more fluid mixture, Galkyd. These mediums aid in giving flexibility to the CWM. The more medium added to the wax the faster the layer will dry and the more wax added the more translucent the layer. When using on rigid supports you can use a higher amount of CWM. Although the rigid supports help, the more wax used the softer more dissolvable the paint layer. Using some medium helps strengthen the wax. If you prefer a gloss finish you can add Neo Meglip and Galkyd G-Gel by Gamblin to the CWM. For texture marble dust, sand, coffee, graphite powder, powdered lime, coffee ground, powdered pigment, and even dirt can be added to mixture. I'm sure there are other grounds you can explore.
CWM allows you to have a variety of layers. No longer is it necessary to have lean first you can mix the thickness of layers using different ratios of wax to paint and grounds.
A variety of supports can be used with CWM, although the more flexibility the support the more fragile the painting will be. It is recommended to use thinner layers of wax on canvas and paper. The various supports are Arches Oil Paper (doesn't have to be gessoed) and comes in two sizes, other types of paper may be used but it must be gessoed, Gessoed Canvas, Gessoed Boards, canvas boards and cradled boards. When using Arches Oil Paper it should be mounted on board and it should be framed under glass. Priming your support first with a solid color of oil paint is advantageous to prevent seeing white of support when scraping. Also, it may be better to be working on more than one support to account for drying time.

CWM is not necessarily new, but the ways in which it is being used are. Thus there are new avenues to explore and discover. Nothing is written in stone yet.
Because there is so much information I decided to have a two-part post on Cold Wax Medium. Next week's post will be about techniques and tools.
Below are some links in the mean time I think you will find helpful.
Rebecca Crowell will be publishing a book on CWM "Cold Wax Medium: Technique, Concepts & Conversations" that will be out late 2016, but sorry to say the first edition has already been presold. She did mention that there would be an additional release in 2017.
In the meantime, I found "Wabi Sabi Painting with Cold Wax, Adding Body, Texture and Transparency to your Art" very helpful, especially in techniques.
Oil and Wax Resources for Cold Wax Painting
Step by Step CW Painting by Sherril Kahn
If you have any questions please add them to comments below. I will then answer them in the next post. Thank you!

Martin Campos "Untying the Knots"
Some people can cross your path and change your whole direction~Anonymous
I had the great opportunity to recently attend a workshop by Martin Campos, PAFA (Pennsylvania Academy of the Fine Arts) instructor, artist and philosopher offered by Melinda Cootsona. My intention prior to going to the workshop was not to learn how to paint the figure, which Martin excels in but to learn how to paint outside the lines. He did not disappoint.
I am finding even at my age the desire to learn is powerful and perhaps to unlearn is just as important; "untying the knots that have been tied".
![FullSizeRender[1]](https://janetvanderhoof.com/wp-content/uploads/2016/07/FullSizeRender1.jpg)
Martin Campos was influenced by his teacher Alex Kanevsky, who gives us permission to destroy and resurrect. The destruction becomes the jewels through transformation; bits and pieces left as signs of their existence.
Martin beckons us to "dialogue with painting, by eradicating and bringing it back. You have to be willing to let something fall apart to discover what is there."
![FullSizeRender[2]](https://janetvanderhoof.com/wp-content/uploads/2016/07/FullSizeRender2.jpg)
Martin goes to the canvas not knowing what is going to happen. This can be a fearful place for me. This is totally against my process. Although, I allow the painting to tell me what it needs, in the beginning I usually tend to know where I am going or where I prefer to go. Now after taking this workshop, I feel lost, but also exhilarated to discover a side of my creativity untouched. Instead of controlling the paint, I will allow it to control me.
Anytime I experience a teacher of this magnitude with such revolutionary thoughts, it causes me to sit and ponder, to wonder where my art will be taking me now. But, I guess that's the point; "I DON'T KNOW". What a fearful and exciting place to be!
[youtube]https://youtu.be/SmckW8iDZTY[/youtube]